An exposed tile edge can make even the most exceptional surface feel unfinished. Whether you have selected richly veined natural stone, large-format porcelain, or a handcrafted-look ceramic, tile edge trims give the installation a clean final line while protecting the areas most likely to receive knocks, moisture, and daily wear.
This small finishing detail has a surprisingly strong influence on the overall design. The right trim can disappear into a calm, tonal scheme, introduce a refined metallic accent, or create intentional contrast around a niche, shower wall, backsplash, or tiled stair. Choosing it well means considering both the visual effect and the realities of the room.
Why Tile Edge Trims Matter
Tiles have a finished glazed or honed face, but their cut edges are often more vulnerable and visually raw. At an outside corner, the edge of a wall tile is exposed to impact. Along the end of a backsplash or at the perimeter of a shower niche, an unfinished edge can interrupt an otherwise considered composition.
Tile trim covers or frames these edges. It creates a more durable boundary, reduces the chance of chips, and delivers the tailored look expected in premium interiors. In wet areas, it also helps form a neat, practical finish around transitions where careful installation and appropriate waterproofing matter most.
There is a design benefit, too. A trim establishes a deliberate stopping point. This is especially valuable when tile does not run wall to wall, when a feature wall meets painted plaster, or when a tiled surface transitions to another material such as timber, stone, or a painted vanity. Instead of looking abruptly cut off, the tilework feels resolved.
The Main Types of Tile Edge Trims
The best profile depends on your tile thickness, the room, and the character of the scheme. A minimal contemporary bathroom may call for a nearly invisible edge, while a decorative kitchen backsplash can carry a more expressive finish.
Straight-edge trims
Straight-edge, or square-edge, profiles create crisp, architectural lines. They are a natural choice for modern kitchens, streamlined bathrooms, and commercial settings where the design calls for structure and restraint. Available in finishes such as matte black, brushed stainless steel, polished chrome, and warm brass tones, they can either blend with fixtures or provide a fine line of contrast.
A dark square-edge trim against pale porcelain creates definition without adding ornament. A brushed brass edge beside warm white or terrazzo tile can echo tapware and lighting for a composed, high-end result. The trade-off is precision: square profiles show alignment clearly, so tile layout and installation need to be particularly accurate.
Round-edge trims
Round-edge profiles soften an exposed corner with a gentle curve. They are well suited to family bathrooms, laundry rooms, and spaces where a less angular finish feels appropriate. Their rounded shape can also be more forgiving in busy zones, where corners may be bumped by baskets, bags, or everyday movement.
While round trims are practical, they are not limited to traditional interiors. In a soft, organic palette of limestone-look porcelain, handmade-look ceramic, or muted mosaic, a curved profile can reinforce the relaxed quality of the materials.
L-shaped trims
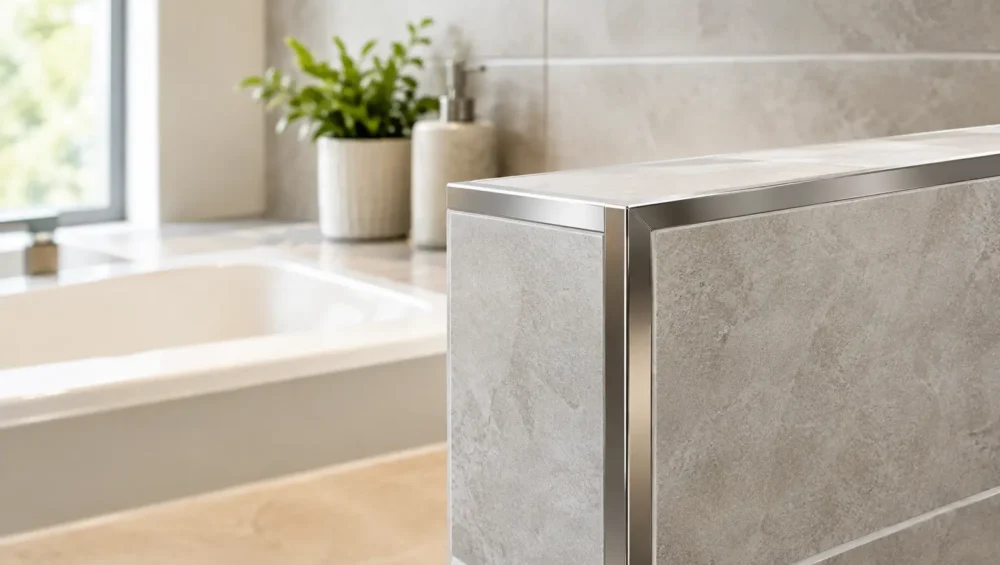
L-shaped profiles are among the most versatile options. One side sits beneath the edge tile while the visible face creates a clean border. They work beautifully at external wall corners, splashback ends, tiled window returns, and shower niches.
Their value lies in their simplicity. An L-shaped trim can be selected in a finish that closely matches the tile for a quiet look, or in metal for a deliberate detail. For large-format porcelain, this style often provides the neat, linear finish that lets the scale and movement of the tile remain the focus.
Tile-in trim profiles
Tile-in profiles are installed as part of the tiling process, with an anchoring leg set behind the tile. They are a lasting, integrated choice rather than an afterthought added once the room is complete. Because the visible edge is slim and precise, they suit premium renovations where every junction has been considered.
They are particularly effective for recessed shelves, wall ends, and outside corners. Planning is essential, however. The profile must be chosen before installation begins, with the correct depth for the tile and adhesive bed.
Bullnose and matching tile edges
Some tile collections offer matching bullnose pieces, pencil liners, or glazed edge tiles. These provide a cohesive finish because they are made from the same material and color family as the field tile. They are especially appealing for classic bathrooms, pool surrounds, traditional kitchen designs, and projects where a metal edge would feel out of place.
Not every collection includes matching accessories, particularly many large-format and specialty tiles. In that case, a carefully selected profile often produces a cleaner result than trying to expose or polish a cut edge.
Choosing a Finish That Belongs in the Design
Think of trim as you would a door handle or faucet. It may be small, but it should belong to the broader material palette. Matching the trim to the tile creates a restrained, continuous look. This works well with minimalist porcelain, pale stone looks, and spaces where the tile is intended to read as one uninterrupted surface.
Contrasting trims make more of a statement. Matte black brings graphic definition to white, cream, or patterned tile. Brushed brass introduces warmth alongside earthy terracotta, ivory ceramic, and green or blue glazed tiles. Stainless or chrome profiles suit cool, polished bathroom palettes and can coordinate naturally with contemporary fixtures.
For commercial projects, durability and maintenance should guide the finish as much as aesthetics. Brushed surfaces tend to hide fingerprints and minor marks better than highly polished metal. In high-traffic areas, a profile that resists scratching and is easy to clean will retain its refined appearance for longer.
Getting the Size Right
Trim depth should suit the finished thickness of the tile, not simply the tile itself. Adhesive adds height, and natural variation can occur with handmade, textured, or natural stone products. In most cases, choose a profile that is equal to or slightly deeper than the tile thickness once installed. A profile that is too shallow can leave an exposed tile edge; one that is too deep can look bulky or collect dirt along the lip.
Large-format tiles often benefit from a slim, straight profile that preserves their expansive appearance. Small mosaics may need a profile that accommodates the sheet and adhesive build-up while keeping the border visually light. For irregular handmade tiles, speak with your installer before ordering, as the finished face can vary from piece to piece.
Corners also need a decision. Mitered trim joints offer a sharp, tailored look, particularly with square profiles. Prefabricated corner pieces can be a practical alternative, reducing visible cut lines and ensuring a consistent finish. Neither is automatically better. The choice comes down to the profile, the installer’s approach, and the level of detail the project calls for.
Where to Use Tile Edge Trims
Outside corners are the most familiar application, but tile trim earns its place in many other areas. A shower niche is one of the most effective opportunities: a fine metal edge can frame the recess and make a functional storage feature feel custom-made. Around a backsplash, trim gives the tile a confident endpoint where it meets paint or cabinetry.
Consider it for tiled window reveals, half-height bathroom walls, fireplace surrounds, laundry splashbacks, and the exposed sides of island benches. Outdoor applications require more care. Select a material suited to changing conditions and make sure the installation details support proper drainage and movement. For pool areas and wet outdoor zones, safety, material suitability, and local installation requirements should take priority over a purely decorative choice.
Plan the Trim Before Tile Installation
The most polished results begin before the first tile is set. Decide where the tile will start and stop, which edges will remain exposed, and whether the trim will match or contrast. This is also the point to confirm tile thickness, order sufficient lengths, and allow for offcuts, corners, and site adjustments.
Bring your trim selection into the same conversation as grout, fixtures, cabinetry, and stone. A sample board can be invaluable, particularly when choosing between brass, black, chrome, or a color-matched edge. Under the room’s actual lighting, subtle differences in warmth and sheen become much easier to see.
A skilled installer remains central to the finish. Premium tile deserves careful substrate preparation, accurate layout, suitable adhesive and grout, and clean transitions at every edge. Tile trims improve durability and appearance, but they cannot compensate for poor setting-out or inadequate waterproofing.
At Mecca Tiles, a considered selection of surfaces can be paired with those final details that make a room feel complete. Choose the trim with the same care as the tile itself, and every corner, niche, and transition will reinforce the quality of the space you set out to create.